This project is currently dead and no longer being maintained.
Tech Used
After spending a significant amount of time doing contract work, moving, and dealing with crises at home — it was finally time to get back to work on my own projects. The last serious project I had been working on for Catalyst was Alchemy1, but so much time had passed that jumping back into it felt … imposing.
Earlier in the year my wife and I had started an evening routine of playing games together2. We were playing some newer titles at first, but I decided I wanted to share some of my favorites from my childhood with her.
These were the games that inspired me to start programming in the first place, and there was a magic quality present3 that I felt was missing from the newer games we had been playing.
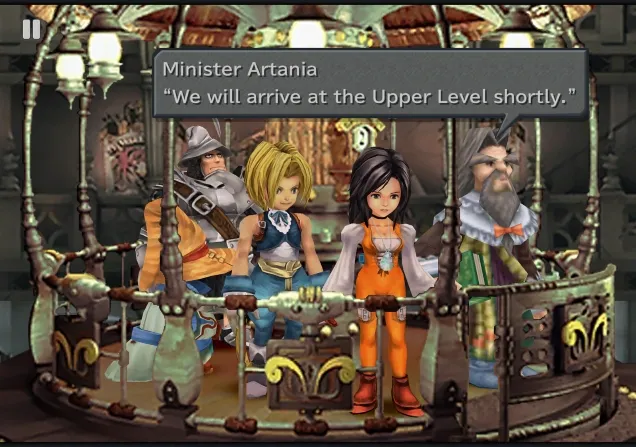
Final Fantasy VII through IX were the definite stand outs for me from the list of classic games we were playing through. Many times as a kid I imagined creating an RPG with pre-rendered backgrounds and simple 3D characters.
Final Fantasy IX is still in my top 5 favorite games.
It’s interesting for all the nostalgia driven indie games I see using the PSX aesthetic4, I don’t see many projects using pre-rendered backgrounds. Finding anyone talking about how to do it was even rarer5. So I began exploring what I would have to do if I wanted to emulate this style.
It’s just an image stuck behind some 3D models, right?
Kinda? But not really.
If you pay close attention to different scenes across a range of games using this technique, you’ll begin to see a wide range of nuances. To emulate the Final Fantasy games on the PS1, here’s a list of problems you need to solve.
Perspective Matching: Ensuring that characters felt like they were part of the scene. This would prove to be far trickier than I initially thought, but for reasons you might not expect.
Collisions: Making sure that characters could move around the scene without clipping through walls or objects.
Depth: Characters move in front of and behind objects in the scene.
Animation: Some parts of the pre-rendered background may be animated. In fact, there were a few select moments in these games that used full motion video.
States: You can kind of treat this as an extension of “animation”. Basically some background elements might need to change based on the state of the game. Like a door being open or closed.
Panning: You need to be able to pan the background around to follow the player or event happening in the scene. This can get really complicated for large scenes that are zoomed in on a portion of the background6.
Then for each of these problems you have to create a solution for authoring the images and scene data, along with a solution for handling them at runtime.
Before we get into the technical details of implementing a solution for pre-rendered backgrounds, I should point out what will be running the game — as it impacts the decisions I made downstream.
I started by trying to implement this all in Godot, but even Godot’s minimal set of abstractions over a rendering backend made things very difficult. And I tried a lot of different approaches to try and make this work7.
Eventually I wound up taking some C, SDL, and OpenGL code from a previous project and reworking it into a very basic engine. Doing this let me have complete control over the rendering pipeline and build a scene management layer specific to my needs.
This was an easy first step into solving this problem.
When we render a 3D scene in Blender, it’s going to have certain properties related to its camera’s perspective projection. Making sure that we could replicate those properties as closely as possible would be key to making sure 3D objects in the scene matched up with the pre-rendered background.
My runtime was using OpenGL to render the scene, so I needed to make sure that I could match the camera’s projection matrix as closely as possible. Thankfully this didn’t wind up being too difficult using cglm and only required a few tweaks and experiments to get it right.
I’ll keep this one short. We can create some very simple geometry in Blender to act as a collision mesh for the scene. This can be kept rough and low poly since it won’t be visible to the player.
The alternative employed in some of these games was a “walkmesh” system8. My guess for implementing a solution like this is to solve the problem of containing characters to a movable area while also providing a surface to pathfinding with a single solution. Especially important given the limitations of the original hardware the game was played on.
Thanks to modern graphics tools and APIs, there’s a few options here. I wound up spending a lot of time trying to figure out the best way to handle this, but if you want your end result to feel authentic, I think you only have two real options.
Rendering multiple layers
We could create a scene in Blender and then just render multiple layers. This appears to be the primary way it was actually done. One of the benefits of this approach is that adding in parallax9 would be trivial.
Less trivial is … everything else. We have to make sure our code manages multiple layers, and we’d have to find a way to potentially split the rendering of some objects into multiple layers10. Some of this can be done manually in Blender using collections without too much issue.
Until you have different objects on different layers that affect one another. The main area where this was a problem? Lighting and shadows. I was able to mostly solve this too using some tricks in Blender, but it only increased the complexity of the problem.
Just use the depth buffer
It’s not too hard to render the depth of your scene out of Blender as a black and white image11. And what’s better is with some minor adjustments and rather simple shader code, you can use these textures to set the color and depth buffers before rendering your 3D objects.
The downside of only using this approach is that you lose the ability for parallax layers. It’s just a static image after all.
In the end, I wound up using a combination of both approaches. I would define layers that hold the color (RGBA) and depth images for the layer and they’d be ordered according to how they should be rendered. The alpha channel of the color image would be used to reveal the layer below it.
We’ll speed through this one as well as it’s not too difficult to solve. Every layer has a set of states, which actually holds the image data for the layer. States are split up into frames and specify a frame rate at which frames will be switched out. The engine will cycle through the frames of the current state at the appropriate speed.
Then it’s just a matter of determining which state to show based on the current state of the game. I handled this by having each scene’s loaded state hold an array of integers that would be used to index into the state array. When switching scenes, it’s important to set the correct state index for each layer.
After all, we just need to move the background at some rate based on where the camera is looking in the scene.
If only it were so easy.
The background image is rendered from a single fixed perspective. If a 3D object, like our player character, runs to the left side of the screen they need to match the perspective of that spot in the image. This isn’t a problem in the middle of the screen, but as you move towards the edges of the screen the problem starts to become more apparent12.
The background’s perspective is warped near the edges of the field of view, but the perspective projection using to render our 3D objects is not. At least, not by default. It’s currently based on our camera’s field of view and aspect ratio.
You’d think this would be a simple fix: just don’t move the view matrix for the scene and rely entirely on calculating the position of the 3D objects based on the camera’s position and orientation. But the problem comes from the automatic culling applied to values outside of the normalized device coordinates (NDC) range of -1 to 113.
After fighting with this for days, the solution literally presented itself to me while I was asleep14. The first thing I did on the computer the next morning was trying it out and it worked.
// Here's a snippet of the vertex shader that handles the 3D objects// rendered within a scene with a pre-rendered background.uniform vec2 uPan;void main() { // ... vec4 pos = projection * view * model * vert; // ... // convert from homogeneous to NDC vec3 ndc = pos.xyz / pos.w; // offset the x and y coordinates ndc.x -= uPan.x; ndc.y += uPan.y; // convert back to homogeneous pos.xyz = ndc; pos.w = 1.0; // ...}
My custom engine used a fixed pipeline that only worked with a specially packed binary blob. In a lot of ways it was quickly becoming a very specialized virtual machine that could only run a single type of game. The engine was designed around scenes that held the typical assets you might expect, like textures, models, and sounds.
All the logic in the game at this point was being handled by the engine itself. Alongside our assets were configurations for these within the scene, like what kind of battles we could trigger (which themselves are another type of scene), the cameras and the properties that configured their behavior, actors that could roam the scene or be interacted with, dialog and cutscene eventing, …
These configurations just fed into hard-coded behavior and were not scriptable in any way.
Scene data structures
If you’re interested what this looked like in the engine code, here’s some snippets that outline them.
/// Defines a state for a scene layer. This holds the frame information.typedef struct { /// Frame rate for the state in frames per second. u16 frameRate; /// Number of frames in the state. u32 frameCount; /// Array of frame indices for the state. Use the width and height of the scene to /// calculate the offset into the color data for a specific frame. u32 *colorData; /// Array of frame indices for the depth data. Use the width and height of the scene to /// calculate the offset into the depth data for a specific frame. u8 *depthData;} SceneLayerState;/// Defines a layer for a scene.typedef struct { /// Number of states for the layer. u32 stateCount; /// Array of states for the layer. SceneLayerState *states; /// Depth range applied to the layer. This is used to adjust the normalized depth /// image(s) for the layer to the correct range. 3D objects are clamped to occupy /// a range between 0.1 and 0.9, allowing layers to always render in front of or /// behind them. f32 depthRange[2]; /// Multiplier applied when panning the image data for this layer. This is used to /// create a parallax effect when panning the background. f32 panMultiplier;} SceneLayer;/// Defines a scene and its components. This is loaded from our custom binary format.typedef struct { /// Width of the background image(s) used for the scene in pixels. We'll scale up the /// image data uniformly if the window size is larger than the image size. u16 width; /// Height of the background image(s) used for the scene in pixels. We'll scale up the /// image data uniformly if the window size is larger than the image size. u16 height; /// Number of layers in the scene. u8 layerCount; /// Array of layers for the scene. SceneLayer *layers; /// Field of view for the camera in degrees. f32 fov; /// Position of the camera relative to scene origin. Used to calculate the view matrix /// using a look at function. cglm_vec3_t cameraPos; // ... actor data, collisions, etc...} Scene;
Using my own engine means I’m now also in charge of creating a pipeline to author content for this proprietary format. I needed a tool that would let me author scenes and characters in a way that would be easy to use and understand.
At this point I had already created a Blender plugin to help with the process of exporting scenes with pre-rendered backgrounds. So it wasn’t a huge leap to start using Blender to operate entirely as my game engine’s editor15.
This meant I could model my scene and actors, define collision meshes, setup animations, and then just tag all the relevant objects with custom properties. Finally I created a single button to push the scene data to my project folder, automatically performing renders, exporting models, and compiling the data into the expected binary format.
I got really far with this Blender based approach, but everything had to be contained within a single Blender file. Making things worse is that it lacked any kind of version control, which could result in tragedy if I had a large project in a file that wound up corrupted. Eventually I started storing the game data in TOML files that I could compile into the engine’s expected binary format(s) using a separate compiler written in Go16.
I eventually started hitting some limitations of Blender’s Python API in relation to what I could do with the user interface. I was constantly abusing node graphs, hidden empties, and custom properties in some really wild ways to get the functionality I wanted. Having used RPG Maker when I was a kid, I realized creating something similar to that could be ideal for myself or anyone else who might wind up using this tool.
Thankfully I was sitting on a whole codebase for authoring content for games in a no-code way: Alchemy. So I copied the project to a new folder and began reworking it into a specialized tool that wouldn’t produce machine code, but custom bytecode that would be handled by the runtime.
Because the engine was built around a static set of functionality, anything I wanted the editor to be able to do would require explicit support in the engine. This led to “configuration option explosion” where I had to keep adding new code paths to support possible features and customizations17.
This led me to start looking at adding an embedded language to the runtime to allow some level of scripting. The obvious recommendation would be Lua, which I did implement.
At the risk of being shunned by my fellow game devs, I actually don’t like the Lua language very much. I like the tech and how easy it is to embed, but I hate the syntax. I briefly explored a few other solutions18, before realizing that using my own bytecode would play nicely with my no-code editor.
Having just worked an experimental fantasy console emulator that used my own machine code format, I began to wonder if I should be using that instead. After all, this engine derived from its codebase in the first place.
This sparked an idea in my head. I could leverage my work on the fantasy console along with my work on an overly-ambitious no-code engine to create an engine with a fixed set of limitations. I decided at this point that I would expand the scope of this project in order to merge several unfinished projects and aspirations into one.
But! The efforts on this new project have been paused for the time being due to some otheropportunities that I couldn’t pass up.